Chapter 3 — Images vs Containers (Hands-On)
Course: Docker (Zero to Hero) · Chapter: 3 of 8 Read on the website: learn.bazardev.com/docker/03-images-vs-containers
🇧🇩 Prefer Bangla? Read this chapter in Bangla →
In Chapter 1 you learned the idea: image = recipe, container = the food made from it. Now let's get hands-on with the commands, and look a little closer at how an image is actually built inside, so nothing feels like magic.
1. A picture is worth a thousand words
Here's what an image and a container actually look like underneath:
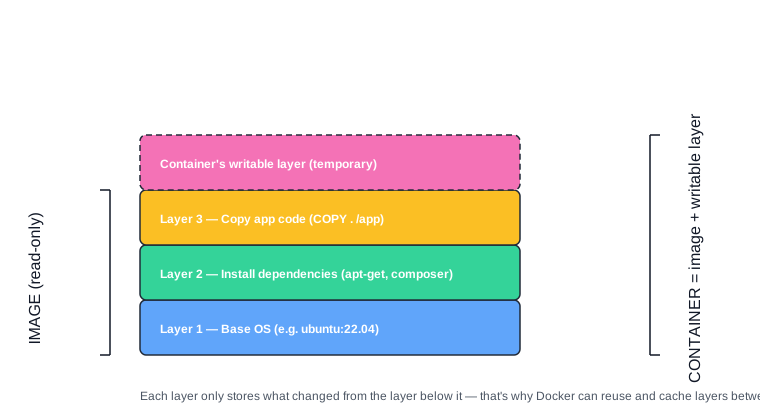
Think of an image like a stack of transparent sheets, one on top of another:
- The bottom sheet is the base operating system (e.g. Ubuntu).
- The next sheet only has the changes needed to install your dependencies.
- The next sheet only has the changes needed to add your app's code.
Each sheet is called a layer. A layer never stores the whole filesystem again — it only stores what's different from the layer below it. Stack them all up, and you get the full image.
When you run that image, Docker adds one more sheet on top — the only one that can be written to. That's your container. Everything below it (the image) stays frozen/read-only; only this top sheet changes while the container runs. Delete the container, and that top sheet disappears — the image underneath is untouched.
Why this matters in practice: if two images both start from ubuntu:22.04, Docker only downloads that base layer once and reuses it for both. That's why pulling a second image that shares a base with one you already have is often much faster.
If you'd like to see this demonstrated step by step, this video covers exactly this part of Docker (images, layers, and the commands below) in detail:
<iframe width="560" height="315" src="https://www.youtube.com/embed/3c-iBn73dDE" title="Docker Tutorial for Beginners - TechWorld with Nana" frameborder="0" allowfullscreen></iframe>(GitHub doesn't play embedded videos in a README — if you're reading this on GitHub, watch it here instead.)
2. Commands for working with images
docker images
Lists every image stored locally.
docker pull nginx:1.27
Downloads a specific version (tag) of an image. If you don't specify a tag, Docker uses latest — but latest is just a label someone chose, not necessarily the newest version, so it's safer to pin a specific tag in real projects.
docker history nginx:1.27
Shows every layer that makes up that image, in the order they were built — this is the command version of the diagram above.
docker inspect nginx:1.27
Dumps detailed metadata about the image as JSON — its layers, environment variables, exposed ports, and more.
docker rmi nginx:1.27
Removes an image (only works if no container is using it — stop/remove those containers first).
docker image prune
Cleans up dangling images — layers left behind from old builds that nothing points to anymore. Good habit to run occasionally so disk space doesn't fill up.
3. Commands for working with containers
You already know docker run, docker ps, docker stop, and docker rm from Chapter 2. A few more that matter:
docker exec -it my-nginx bash
Opens an interactive shell inside a running container — as if you SSH'd into it. Extremely useful for poking around or debugging. (-it means interactive + attach a terminal; without it the command would run and immediately return, not give you a shell.)
docker cp my-nginx:/etc/nginx/nginx.conf ./nginx.conf
Copies a file out of a running container onto your machine (or the reverse, machine-to-container).
docker restart my-nginx
Stops and starts the container again — useful after changing a mounted config file.
docker pause my-nginx
docker unpause my-nginx
Freezes all processes inside the container without stopping it — rarely needed day to day, but good to know it exists.
4. Try it yourself
docker run -d -p 8080:80 --name my-nginx nginx
docker exec -it my-nginx bash
# you're now inside the container
cat /etc/os-release
exit
# back on your own machine
docker history nginx
docker rm -f my-nginx
Running cat /etc/os-release inside the container shows you the base OS layer nginx's image was built on — you've just looked directly at Layer 1 from the diagram above.
5. Key takeaways
- An image is a stack of read-only layers; each layer only stores what changed from the one below it.
- A container adds one writable layer on top of an image — delete the container, and only that top layer disappears.
- Shared base layers between images are downloaded once and reused — this is why Docker pulls are often faster than expected.
docker exec -it <container> bashgives you a shell inside a running container — your go-to debugging tool.docker image pruneclears out unused, dangling image layers.
6. Test yourself (exam prep)
Q1. Why does Docker only download a base layer once, even if two images use it?
Because layers are content-addressed and shared on disk. If an image needs a layer Docker already has (e.g. the same ubuntu:22.04 base), it reuses the existing copy instead of downloading it again.
Q2. What happens to a container's writable layer when the container is removed?
It's deleted along with the container. The image underneath (its read-only layers) is untouched and can be used to start a brand-new container at any time.
Q3. What does `docker exec -it my-nginx bash` actually do?
It starts an interactive (-i) session with a terminal attached (-t) running bash inside the already-running my-nginx container — effectively giving you a shell inside that container, similar to SSH-ing into it.
Q4. Why is pinning a specific tag (e.g. `nginx:1.27`) safer than using `nginx:latest`?
latest is just a label — whoever built the image decides what it points to, and it can change over time. Pinning an exact version tag guarantees you always get the same image, which avoids surprise breakage when latest is updated.
7. Free resources
- Official docs: Understanding image layers
- Official docs:
docker execreference - Video: "Docker Tutorial for Beginners [FULL COURSE in 3 Hours]" — TechWorld with Nana (embedded above)
Next: Chapter 4 — Dockerfile: Write Your Own Image → (coming soon)