Chapter 5 — Volumes & Networking
Course: Docker (Zero to Hero) · Chapter: 5 of 8 Read on the website: learn.bazardev.com/docker/05-volumes-and-networking
🇧🇩 Prefer Bangla? Read this chapter in Bangla →
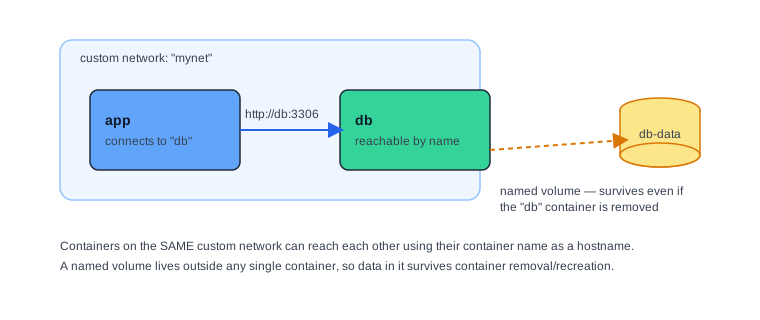
Two things trip up almost everyone learning Docker: where does my data actually live, and how do my containers talk to each other. Both get much simpler once you see them drawn out.
If you want this shown step by step with real commands, this video covers both topics well:
<iframe width="560" height="315" src="https://www.youtube.com/embed/5grbXvV_DSk" title="Docker Networking Tutorial - Christian Lempa" frameborder="0" allowfullscreen></iframe>(GitHub doesn't play embedded videos in a README — if you're reading this on GitHub, watch it here instead.)
1. The problem: containers are disposable
Remember from Chapter 3: a container's writable layer disappears the moment you remove the container. That's great for apps (clean, disposable, restart from scratch) — but terrible for a database. If you docker rm your MySQL container, you do not want to lose every row of data you ever saved.
Volumes solve this: they live outside any single container, so you can remove and recreate the container as many times as you like, and the data in the volume stays put.
docker volume create db-data
docker run -d --name my-db -v db-data:/var/lib/mysql -e MYSQL_ROOT_PASSWORD=secret mysql:8
docker volume create db-data— makes a named volume, managed entirely by Docker.-v db-data:/var/lib/mysql— mounts that volume at/var/lib/mysqlinside the container, which is exactly where MySQL stores its data files.
Now try this:
docker rm -f my-db
docker run -d --name my-db -v db-data:/var/lib/mysql -e MYSQL_ROOT_PASSWORD=secret mysql:8
Even though you deleted the container and started a brand-new one, all your previous data is still there — because it never lived inside the container to begin with. It lived in db-data.
docker volume ls
docker volume inspect db-data
docker volume rm db-data
Named volumes vs. bind mounts
There's a second, related flag worth knowing — a bind mount, which maps an actual folder from your machine directly into the container:
docker run -d -p 3000:3000 -v $(pwd)/src:/app/src my-first-app
Named volume (-v db-data:/path) |
Bind mount (-v $(pwd)/src:/path) |
|
|---|---|---|
| Managed by | Docker itself | You — it's a real folder on your machine |
| Best for | Databases, anything you want Docker to manage and back up | Live-editing code during local development |
| Where it lives | Docker's internal storage area | Wherever you point it, on your machine |
2. The problem: containers can't see each other by default
Start two containers separately, and by default they're isolated from each other — app has no idea db exists. For a real application (an app server talking to a database), they need to communicate.
docker network create mynet
docker run -d --name db --network mynet -e MYSQL_ROOT_PASSWORD=secret mysql:8
docker run -d --name app --network mynet my-first-app
Here's the part that feels like magic the first time you see it: because both containers are on the same custom network (mynet), the app container can reach the db container simply by using its name — db — as if it were a hostname:
docker exec -it app ping db
Docker runs a built-in DNS server on every custom network, so container names resolve to the right internal IP addresses automatically. You never have to hardcode an IP address that might change.
docker network ls
docker network inspect mynet
Important nuance: this automatic name-based lookup only works on a custom network you created (docker network create ...). Containers started on Docker's default network (if you don't specify --network at all) can't reliably reach each other by name — which is exactly why real projects always create a dedicated network, and why Chapter 6 (Docker Compose) does this for you automatically.
3. Key takeaways
- A container's own storage disappears when the container is removed — volumes exist outside the container so data survives.
-v <volume-name>:/pathmounts a Docker-managed named volume;-v /host/path:/pathbind-mounts a real folder from your machine.- Containers on a custom network can reach each other by container name — Docker provides DNS resolution automatically.
- Containers on Docker's default network cannot reliably reach each other by name — always create a custom network for multi-container setups.
4. Test yourself (exam prep)
Q1. If you remove a database container without a volume attached, what happens to its data?
It's lost. The data lived only in the container's writable layer, which is deleted along with the container. This is exactly why a named volume should always back a database container's data directory.
Q2. What's the difference between a named volume and a bind mount?
A named volume is created and managed entirely by Docker, in Docker's own storage area — ideal for databases. A bind mount points directly at a real folder on your machine, which is ideal for live-editing source code during development, since changes on your machine show up inside the container instantly.
Q3. Why can the `app` container reach `db` just by using "db" as a hostname?
Because both containers were started on the same custom Docker network, and Docker runs a built-in DNS server on that network that automatically resolves container names to their internal IP addresses.
Q4. Why doesn't this name-based lookup work if you don't create a custom network first?
Docker's automatic DNS resolution between containers is a feature of custom (user-defined) networks. Containers left on Docker's default network don't get the same reliable name resolution, which is why real-world multi-container setups always create a dedicated network.
5. Free resources
- Official docs: Manage data in Docker
- Official docs: Docker networking overview
- Video: "Docker Networking Tutorial // ALL Network Types explained!" — Christian Lempa (embedded above)
Next: Chapter 6 — Docker Compose: Multi-Container Apps → (coming soon)